Recently, I needed to implement a custom load management solution that would allow an internal user pool shared access to a set of containers with a specific set of load restrictions.
This blog post recounts my journey into this endeavor.
Problem Introduction

If you are involved in the peculiarities of container development and deployment, inevitably at some point you will be faced with the challenge of managing traffic to your containers.
Most forays in this area typically begin with the addition of a reverse proxy (like Nginx) to the container stack to manage issues like domains and https traffic; However, as your functionality requirements grow, you may find that you need a more sophisticated solution than what the basic edition of Nginx can provide, and this is where HAProxy will typically come into play.
While this is all well and good for most situations, there can be times when you need to implement something beyond the standard norm.
Note: Typically, when you find yourself in this situation, it is a good idea to take a step back and reevaluate your requirements, as most of the time you are likely going about solving the problem in the wrong way.

As I mentioned earlier, I needed to implement a custom load management solution that would allow an internal user pool shared access to a set of containers with a specific set of load restrictions.
now this situation, while not overtly unique, is a bit peculiar as my requirements were:
- A server in the backend pool should only accept a limited number of users from the client pool
- Network connections from users that have a server assigned to them should be directed to the same backend server
- Server assignment should expire after a set period of time
Visually, this looks something like this:
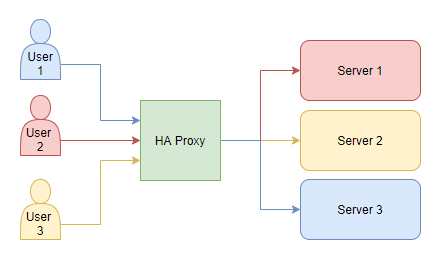
where the proxy assigns a user to an available server based on the user’s IP address and the server’s availability.
This type of architecture is not something commonly found in today’s standard cloud structures. Since the goal is to typically distribute a shared application evenly across a small number of backend servers rather than to assign users to a discreet server.
After all, the whole point of having a server pool is to easily allow a large number of users access to a desired application via one endpoint rather than having to install that application locally on each user’s machine.

In my case, the application in question was unique in that it only supported a limited number of users at a time (making it not vertically scalable); however, multiple instances of the application could be run (making it horizontally scalable).
The wrench in the works came as a result of the accompanying client side application that expected a single server to
be assigned to it for the duration of its session (making it stateful). While the user could also
run the client application either concurrently or using an older application version with the
expectation that each new client session would be assigned to the previous server session.
Note: a client connection with different backend servers would result in major problems, so this event had to be avoided
This requirement meant that the proxy needed to be able to assign a user to a server based on the user’s IP address
(an attribute that is easy enough for HAProxy to manage via balance source or stick-table type ip);
however, the proxy also needed to be able to limit the number of users assigned per server
(which can kinda be done via balance leastconn or maxconn but these approaches come with their own
set of problems).
For example, leastconn balancing would, at startup, correctly assign users to the server with the least number
of connections; However, since leastconn connections are not tracked by users, after a period of time a
small number of really active users could end up spiking the connection count and leastconn would start
assigning new users to a backend server that, while having a lower connection count, could have a higher user count.
maxconn on the other hand would limit the number of connections to a server, which would prevent user over
saturation, but this would result in very active users being limited to a set number of client concurrent connections,
which was also equally unacceptable.

After much research, I found that the best way to implement this was to use the LUA extension
in HAProxy to create a custom load management solution that would allow me to implement my desired balance
functionality programmatically.
Creating a Test Environment
To begin, I needed a simplistic test environment that would allow me to test my
custom LUA load management solution without disrupting my current production environment.
To facilitate this, I needed to create a simplistic docker-compose stack that consisted of a single HAProxy container, a few basic web containers to emulate the backend, and a curl client container to emulate user traffic.
Let’s Make a Simplistic Python Web Server

Towards this end I created a little GitHub repository and added a basic requirements file requirements.txt:
python-dotenv~=1.0.1.0
pydantic-settings~=2.7.1.0
Flask~=3.1.0
Which included python-dotenv and pydantic-settings to manage environment variables along with Flask to
create a simple web server.
Now this set-up is likely a bit overkill for a simple web server, but having a great environmental management system at the cost of some extra code is a good trade-off in my book.
from here I created a class module app_settings.py to hold my pydantic application settings

""" a module to hold the application settings """

from typing import Union, List

from pydantic_settings import BaseSettings, SettingsConfigDict


class AppSettings(BaseSettings):
    """a pydantic settings class to hold the application settings"""

    #: the configuration for the model (use env, set the env encodeing,  sensitive, and nested delimiter)
    model_config = SettingsConfigDict(
        env_file=".env",    # the name of the .env environmental file to load
        env_file_encoding="utf-8", # the encoding of the environmental file
        case_sensitive=False, # parse environments as case insensitive
        env_nested_delimiter="__", # if using nested environments, use this delimiter to separate in the .env file
    )

    #: a list of allowed hosts that can access the flask app local dev
    allowed_hosts: Union[str, List[str]] = "0.0.0.0"

    #: the port to run the flask app on
    port: int = 5001

    #: the server name for the flask app
    server_name: str = "localhost"
along with a configuration module config.py to hold the flask configuration.

""" a module to hold flask app configurations """

from dotenv import load_dotenv
from flask import Flask

from application.data.data_model_settings.app_settings import AppSettings

# pydantic settings won't handle .env searching very well... dot env handles it better,
# so use it to load the .env file
load_dotenv()

#: our shared application settings
config: AppSettings = AppSettings()

#: the flask application
app = Flask(__name__)
I also create a view module views.py to hold the flask routes and views

import time
from typing import Iterator

from flask import Response
from flask.typing import ResponseReturnValue

from application.config import app
from application.data.data_model_settings.app_settings import AppSettings

def __stream(
    data_to_stream="data: Still connected...\n\n",
    stream_time: int = 600,
    stream_delay: int = 10,
) -> Iterator[str]:
    """Keeps sending data periodically to keep the connection alive for
    :param data_to_stream: the data to send
    :param stream_time: the time to keep the connection alive
    :param stream_delay: the delay between sending data
    :return: some data to keep the connection alive
    """

    start_time = time.time()
    while time.time() - start_time < stream_time:
        yield data_to_stream
        time.sleep(stream_delay)

@app.route("/stream")
def keep_alive() -> ResponseReturnValue:
    """Keeps the connection alive by sending data periodically
    :return: random data to keep the connection alive
    """

    return Response(
        __stream(),
        content_type="text/event-stream",
    )

@app.route("/")
def get_host() -> ResponseReturnValue:
    """return the server name
    :return: the server name
    """

    # get the app settings here.
    # note we could also use the config variable from our config module, but ideally, we want to stay within
    # the app context to avoid threading issues
    config: AppSettings = app.config.get("APP_SETTINGS", None)

    # if the config is None, raise an error
    if config is None:
        raise ValueError("The app settings are not set in the app context")

    return Response(config.server_name)
where the default route / returns the server name defined by the environment variable SERVER_NAME and the
/stream route keeps the connection alive by sending data periodically every 10 seconds for 10 minutes.
Finally, a main basic_web_server.py script to run the flask app was added.

""" This module is the entry point for the flask application
"""

# Note importing config will result in
# the environment variables being loaded
from application.config import config, app


def __main() -> None:
    """our main entry point for the flask application
    :return: None
    """

    # the flask app run command needs a particular set of parameters to configure the server
    # we pass these parameters in as a dictionary from the configuration object
    app_parameters = {
        "host": config.allowed_hosts,
        "port": config.port,
    }

    # Add a new key to app.config and pass the whole AppSettings object to it for later use by views
    app.config["APP_SETTINGS"] = config

    # run the flask application
    app.run(**app_parameters)


if __name__ == "__main__":
    __main()
At this point, we have a working flask application that will return the server name defined by the environment
variable SERVER_NAME when a user accesses the root route, and we are now ready to create a docker container to host
it.
Let’s Make a Docker Container

To make things easy, I created a Dockerfile in the root of the project
# Use the python 3.10.12-slim-bookworm image as the base image
FROM python:3.10.12-slim-bookworm

# update the linux distribution and install curl for client emulation
RUN apt-get update \
    && apt-get install -y \
        curl

# Create app directory in our linux user space
WORKDIR /usr/app

# copy the requirements.txt file to the user space app directory
COPY requirements.txt .

# upgrade pip and install the requirements
RUN pip install --upgrade pip \
    && pip install  -r requirements.txt

# copy the contents of the src directory to the container
COPY ./src/ .

# set the default command to bash
CMD ["bash"]
 that leverages the
 python:3.10.12-slim-bookworm debian python image as the base image and installs the curl
application that we will use to emulate user traffic.
I also opted to update pip before installing the python requirements to ensure that everything was up to date.
Note: the order of the Docker commands is somewhat important as the docker build process can cache the build layers and only rebuild them if the contents have changed.
I then built the docker container using the following command:
docker build --progress=plain -t lime-coder/all-in-one-app:local .
where lime-coder/all-in-one-app:local is the name of the container image.
Note: in this case, I am not pushing the container image up to a docker registry, so the image name is just local to my development environment
Let’s Make a Docker-Compose Stack

At this point we have our basic web server container along with our curl client (as we recycled our server container for this task via installing curl), so we are now ready to create a docker-compose stack.
In this example I am going to use an older version of the single host docker-compose file format (V2.7) for brevity, but feel free to select a newer version if you prefer.
version: "2.7"

networks:
  default:
    driver: bridge
  backend:
    internal: true
  client:
    internal: true
I am also going to create three separate docker networks:
- An isolated network for our backend servers called
backend, - An isolated network for our client servers called
client(this will allow us to emulate a user IP pool), - And one
defaultnetwork to allow the development computer to access the proxy server.
I am also going to create three backend servers that will run our basic web server application and be assigned a unique server name:

services:
  backend-server-1:
    image: "lime-coder/all-in-one-app:local"
    container_name: "backend-server-1"
    command: "python /usr/app/basic_web_server.py"
    stdin_open: true
    tty: true
    networks:
      backend:
        aliases:
          - server1
    environment:
      SERVER_NAME: "Backend Server 1"

  backend-server-2:
    image: "lime-coder/all-in-one-app:local"
    container_name: "backend-server-2"
    command: "python /usr/app/basic_web_server.py"
    stdin_open: true
    tty: true
    networks:
      backend:
        aliases:
          - server2
    environment:
      SERVER_NAME: "Backend Server 2"

  backend-server-3:
    image: "lime-coder/all-in-one-app:local"
    container_name: "backend-server-3"
    command: "python /usr/app/basic_web_server.py"
    stdin_open: true
    tty: true
    networks:
      backend:
        aliases:
          - server3
    environment:
      SERVER_NAME: "Backend Server 3"
along with a haproxy container that will act as our proxy and bind our three networks together.

  haproxy:
    image: "haproxytech/haproxy-alpine:2.4"
    container_name: "haproxy"
    stdin_open: true
    tty: true
    ports:
      - "5001:5001/tcp"
      - "6801:6801/tcp"
    volumes:
      - "./temp/haproxy:/usr/local/etc/haproxy:ro"
    networks:
      default:
        aliases:
          - haproxy
      backend:
      client:
Note: I have opened up the haproxy ports 5001 and 6801 to allow the development computers to access the proxy server and the proxy status page via web browser
I also created a ./temp/haproxy directory to hold the haproxy configuration (haproxy.cfg) and a folder within
called lua (./temp/haproxy/lua) to hold our LUA scripts.
Finally, I created six curl client containers to emulate user traffic via unique IPs provided by the client network

  client-1:
    image: "lime-coder/all-in-one-app:local"
    container_name: "client-1"
    stdin_open: true
    tty: true
    networks:
      client:

  client-2:
    image: "lime-coder/all-in-one-app:local"
    container_name: "client-2"
    stdin_open: true
    tty: true
    networks:
      client:

  client-3:
    image: "lime-coder/all-in-one-app:local"
    container_name: "client-3"
    stdin_open: true
    tty: true
    networks:
      client:

  client-4:
    image: "lime-coder/all-in-one-app:local"
    container_name: "client-4"
    stdin_open: true
    tty: true
    networks:
      client:

  client-5:
    image: "lime-coder/all-in-one-app:local"
    container_name: "client-5"
    stdin_open: true
    tty: true
    networks:
      client:

  client-6:
    image: "lime-coder/all-in-one-app:local"
    container_name: "client-6"
    stdin_open: true
    tty: true
    networks:
      client:
Note: I plan on using the remote console on each of the client containers to run the curl command to emulate user traffic

Let’s Make a HAProxy Configuration
At this point we have our docker-compose stack set up, so we are now ready to create a haproxy configuration file.
I created a haproxy.cfg file in the ./temp/config directory to hold the haproxy configuration.
global
  stats socket /var/run/api.sock user haproxy group haproxy mode 660 level admin expose-fd listeners
  log stdout format raw local0 info
Where I set up the global configuration to log to stdout and expose the haproxy stats socket.
I also added a defaults section to set the default timeout values, global logging, and DNS resolution
configuration (optional).

defaults
  mode http
  timeout connect 5s
  timeout client 620s
  timeout server 620s
  timeout http-request 10s
  log global
  default-server init-addr last,libc,none
From here the stats section was configured on port 6801 to allow access to the haproxy stats page.

frontend stats
  bind 0.0.0.0:6801
  stats enable
  stats uri /
  stats refresh 10s
Note: 0.0.0.0 was used over * because of docker host resolution issues
The frontend section was configured to listen on port 5001 and pass traffic to the backend servers.

frontend server_frontend
  bind 0.0.0.0:5001-5001
  mode tcp
  default_backend server_backend
The backend section was configured to balance the traffic between the backend servers using the leastconn balancing,
stick-table type ip and stick on src options were used to assign users to a server based on their IP address.
backend server_backend
  balance leastconn
  stick-table type ip size 1m expire 1d
  stick on src
  mode tcp
  option tcp-check
  tcp-check connect port 5001
  server s1 server1 check inter 2s fall 1 rise 100
  server s2 server2 check inter 2s fall 1 rise 100
  server s3 server3 check inter 2s fall 1 rise 100
The option tcp-check and tcp-check connect port 5001 options were used to check the backend server’s
health (not required but good practice), while three backend servers were defined based on our docker-compose stack.
Note: the docker network alias names were used to define the backend servers rather than an IP address
At this point we should now have everything we need to test our custom load management solution minus the LUA
load manager solution itself.
but now that all the pieces are in place, we can do a quick test to ensure that everything is working as expected via the following command:

docker-compose up

where navigating to http://127.0.0.1:5001 should bring up the backend server.
We can see that we were assigned to Backend Server 1 based on our IP address via leastconn balancing and further
browser refreshes results in us getting the same server via the stick-table type ip and stick on src
while navigating to http://127.0.0.1:6801 should bring up the haproxy stats page
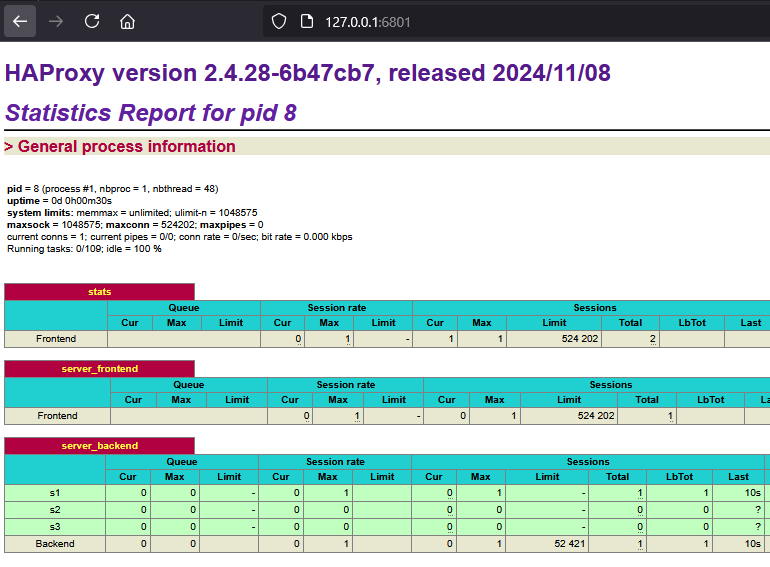

where we can see that backend server 1 has had one session connection assigned to it.
Visualizing The Proxy Problem
Now that we have our basic setup working, we can now visualize the problem with the current load management solution.
To do this, I will leverage the http://127.0.0.1:5001/stream route in the basic web server to keep
the connection alive for 10 minutes across a number of local web browser tabs. This approach will allow us to emulate
multiple active TCP/IP connections from the same client IP.


Next, I will then open up a terminal connection into two of my six client containers and run the following command:
curl http://haproxy:5001
where client 1 was assigned to backend server 2 and client 2 was assigned to backend server 3.

which is expected as the leastconn balancing algorithm should assign the client to the backend server
with the fewest connections.
At this point all backend servers now have one connection assigned to them, so the next client should
ideally be assigned to backend server 1; however, if we run the curl command on our third client container,
we see that backend server 2 is assigned instead.
If we run the curl command on our fourth, fifth, and sixth client containers, we see that
backend server 3 is assigned, then backend server 2, and finally backend server 3.

which highlights the problem with the current load management solution, since the leastconn balancing algorithm is
not tracking connections by user, but rather is doing assignments based on the session connections
count as previously mentioned.

Creating a Custom LUA Load Management Solution
To solve this load distribution problem, I needed to create a custom load management solution and fortunately
newer versions of HAProxy supports the usage of the LUA scripting language to do just that.
While LUA is a rather antiquated scripting language (it literally means “moon” in Portuguese), it was rather popular in the late 90’s by C++ developers looking for a quick way to add scripting support to their applications.
Aside: I have used it a few times over the years in C++ applications myself and have found it to be rather powerful and quite flexible but also quirky
In terms of HAProxy, the LUA scripting language has its own set of internal functions and objects that are
somewhat documented within the HAProxy LUA API Manual; However, you might also need to review
the HAProxy LUA User Guide or even the HAProxy Source Code to get a better
understanding of the commands available.
LUA Scripting

To begin, I created a get_backend_server_names.lua script in the ./temp/haproxy/lua directory to hold
a utility function to get the backend server names from the current haproxy configuration.
Note: I opted to use Jetbrains Pycharm and the EmmyLua Plugin to develop my LUA scripts as it provided a lot of helpful features like code completion and syntax highlighting.
-- a utility scripts that retrieves the list of backend servers from HAProxy's configuration.

-- utility function to get all backend server names from haproxy
function get_backend_server_names()

    -- a table to store all server names
    local servers = {}

    -- Loop through all backends
    for backend_name, backend in pairs(core.backends) do
        -- Loop through all servers in the backend
        for server_name, _ in pairs(backend.servers) do
            -- Add the server name to the list
            table.insert(servers, server_name)
        end
    end

    -- Sort the list of server names
    -- Note this will likely determine the order in which servers are selected if they have the same load
    table.sort(servers)

    -- Return the list of server names
    return servers
end

-- Make our function available to other scripts via require
return get_backend_server_names

While I could have simply added this function to my main LUA user script, I wanted to learn how to properly import modules in LUA within the HAProxy environment in case the need arose in the future.
Next I created a user_balance.lua script in the ./temp/haproxy/lua directory to hold my custom
load management solution.
I then added some global variables to hold server assignments, client mappings, and client activity times:
-- Load-balancing script that assigns a server to a client based on IP address.
-- Supports client sticky sessions with configurable expiration.
-- Requires `get_backend_server_names.lua` to retrieve backend servers.

-- Load the utility function to get backend server names
local get_backend_server_names = require("get_backend_server_names")

-- a global table to store the number of clients assigned to each server
local server_assignments = {}
-- a table to store the mapping of client IPs to servers
local client_server_map = {}
-- a table to store the last seen time of each client
local client_last_seen = {}
where nothing outside of standard LUA tables was used to store our global data.
Note: A more adventurous developer might consider metatables (aka pseudo-classes) here but LUAs class system is a bit quirky

Next I created a function to clean up expired client assignments:
-- Function to clean up expired client mappings
-- accepts a client timeout in seconds
local function cleanup_expired_clients(client_timeout)

    -- set the client timeout to 1 day if not provided
    client_timeout = client_timeout or 60 * 60 * 24

    -- Get the current time
    local current_time = os.time()

    -- Loop through all clients
    for client_ip, last_seen in pairs(client_last_seen) do
        -- If the client has not been seen for longer than the timeout
        if current_time - last_seen > client_timeout then
            -- get the server assigned to the client
            local mapped_server = client_server_map[client_ip]
            -- if a valid assignment
            if mapped_server then
                -- decrement the number of clients assigned to the server or set to 0 if negative
                server_assignments[mapped_server] = math.max((server_assignments[mapped_server] or 0) - 1, 0)
                -- log the removal of the expired client
                core.Info("Expired client " .. client_ip .. " removed from server " .. mapped_server)
            end
            -- remove the client from the mapping and last seen tables
            client_server_map[client_ip] = nil
            client_last_seen[client_ip] = nil
        end
    end
end
Where the user can define a client timeout in the haproxy configuration file
(via set-var(txn.client_timeout) str(86400)) to determine how long a client will remain assigned to
a server after a period of inactivity.
In this case I opted for a default value of 24 hours (or 86,400 seconds) of packet inactivity before the server assignment is removed.
Aside: This approach is somewhat non-ideal for my particular application, as I really should just assign users to a server via a configuration file based on some type of prioritization system rather than a dynamic assignment, but I digress…

Note: This management approach can be problematic for stream-based connections, which maintain a persistent connection with continuous reply packets, because the client update events may only be triggered once per transaction, rather than on every packet.
As a result, if the connection remains open and data is streamed in chunks, the client might eventually be considered inactive if no new response transactions occur.
In my use case, this isn’t a concern since the client always sends a new predictable request instead of keeping a long-lived connection open; However, if you plan to use this method for long-lived connections with frequent reply traffic and short assignment timeouts, be aware that you may need to implement an alternative mechanism to update the clients last seen time to avoid this issue.
Warning: HAProxy LUA scripts don’t provide a great way to update the clients last seen time in this scenario.
The best solution I have found is to use LUA’s io.popen to invoke a command like netstat to get the client connections
which is obviously not ideal

From here I created a function to manage load balancing:
-- Function to get the least loaded server
local function get_least_loaded_server()
    -- Get the list of available servers from the configuration
    local servers_list = get_backend_server_names()
    -- Log the available servers (for debugging)
    core.Info("Available servers: " .. table.concat(servers_list, ", "))

    -- Initialize the best server and minimum load
    local best_server = nil
    local min_load = math.huge

    -- Loop through all servers
    for _, server in ipairs(servers_list) do
        -- Get the load for the server or default to 0
        local load = server_assignments[server] or 0
        -- Log the load for the server (for debugging)
        core.Info("Server " .. server .. " has " .. load .. " users")
        -- If the load is less than the minimum load
        if load < min_load then
            -- Update the minimum load and best server
            min_load = load
            best_server = server
        end
    end

    -- Return the best server
    return best_server
end
Which calls our get_backend_server_names utility function to get the list of backend servers
and then loops through the list to find the server with the least number of clients assigned to it.

I also added a client update function:
-- Function to update client last seen time
-- accepts a client transaction object as an argument
local function update_last_seen(txn)
    -- Get the client IP address
    local client_ip = txn.f:src()
    -- Update the last seen time for the client
    client_last_seen[client_ip] = os.time()
    -- Log the last seen time (for debugging)
    core.Info("Client " .. client_ip .. " last seen at " .. client_last_seen[client_ip])
end
To update the client’s last seen time when a client transaction occurs.
Again, finding a way to call this event can be problematic for stream-based connections…
Next, I created an action function to handle the client assignment during a new client transaction:

-- Register the action user_balance in the tcp-req event
-- haproxy will call this function for each new tcp request and pass in a client transaction object
core.register_action("user_balance", {"tcp-req"}, function(txn)
    -- Get the client IP address
    local client_ip = txn.f:src()
    -- Get the current time
    local current_time = os.time()
    -- Get the client timeout from the transaction variable set in the configuration file
    local client_timeout = tonumber(txn:get_var("txn.client_timeout")) or 60*60*24
    -- Get the maximum number of users per server from the transaction variable set in the configuration file
    local max_user_per_server = tonumber(txn:get_var("txn.max_user_per_server")) or 2

    -- Log the new connection
    core.Info("New connection from: " .. client_ip .. ", Timeout: " .. client_timeout .. " seconds")

    -- Update the last seen time for the client
    update_last_seen(txn)

    -- Clean up expired client mappings
    cleanup_expired_clients(client_timeout)

    -- If the client already has a server assigned
    if client_server_map[client_ip] then
        -- if not expired, reuse the assigned server
        local assigned_server = client_server_map[client_ip]
        -- set variables we can use in the configuration
        txn:set_var("txn.mapped_server", assigned_server)
        txn:set_var("txn.lb.server", assigned_server)
        -- log the reuse of the session
        core.Info("Reusing session: Client " .. client_ip .. " → Server " .. assigned_server)
        -- return to exit the function
        return
    end

    --at this point the client does not have a server assigned so we need to assign one
    local best_server = get_least_loaded_server()

    -- if there is an available server
    if best_server then
        -- calculate the current load of the server
        local current_user_load = (server_assignments[best_server] or 0) + 1
        -- if the server is full
        if current_user_load > max_user_per_server then
            -- log the rejection of the client
            core.Alert("Server " .. best_server .. " is full, rejecting client " .. client_ip)
            -- end the transaction
            txn:done()
            -- return to exit the function
            return
        end

        -- assign the client to the server
        server_assignments[best_server] = current_user_load
        client_server_map[client_ip] = best_server
        client_last_seen[client_ip] = current_time

        -- set variables we can use in the configuration
        txn:set_var("txn.mapped_server", best_server)
        txn:set_var("txn.lb.server", best_server)
        -- log the assignment of the client
        core.Info(
                "Assigning client " ..
                client_ip .. " to " .. best_server
                .. " (now has " .. server_assignments[best_server] .. " users)"
        )
        -- return to exit the function
        return
    end

    -- if there are no available servers
    -- log the rejection of the client
    core.Alert("No available server for client " .. client_ip)
    -- end the transaction
    txn:done()
end)
Where, this function is quite simple as it calls our client cleanup and update methods and then checks if the client has previously been assigned to a server. Depending on the client assignment status, this function will either assign a new server to the client or send the client to its previously assigned server.
Some code was also included here to limit the number of users per server (the default is 2) and to reject clients that exceed this limit.

Also, some variables were set to allow the HAProxy configuration file the ability to make decisions based on the client assignment (as LUA can’t directly assign a client to a server, only the configuration settings file can do that).
Lastly, I added another action function to handle the client assignment during a packet transaction:
-- Register the action update_last_seen in the tcp-res event
-- note that this event is not guaranteed to be called for every packet transaction
core.register_action("update_last_seen", {"tcp-res"}, function(txn)
    -- Update the last seen time for the client
    update_last_seen(txn)
end)
which will update the client-last seen time during the beginning of a packet transaction.
Note: once again, this event is not guaranteed to be called for every packet transmission, so be aware of this limitation if you plan to use this method for long-lived connections with frequent reply traffic.
HAProxy Configuration For LUA

At this point we now have all of our LUA scripts ready to test, but we still need to configure
our HAProxy configuration file (haproxy.cfg) to use them.
To begin, I updated the global section of my configuration file to include a lua-prepend-path inorder to add the
local lua path to the HAProxy LUA search path.
global
  lua-prepend-path "/usr/local/etc/haproxy/lua/?.lua"
  lua-load /usr/local/etc/haproxy/lua/user_balance.lua
Note: we could have also placed the LUA scripts in the default HAProxy LUA search path, but this approach seemed more appropriate given the docker configuration structure.

I also added a lua-load directive to load the user_balance.lua script that we will use to manage the load balancing.
Next, I updated the frontend section of my configuration file to include the script transactional variables that control the client timeout and the maximum number of users per server.
frontend server_frontend
  bind 0.0.0.0:5001-5001
  mode tcp
  tcp-request content set-var(txn.client_timeout) str(86400)
  tcp-request content set-var(txn.max_user_per_server) str(2)
  tcp-request content lua.user_balance
  use_backend server_backend if { var(txn.lb.server) -m found }
I also added the user_balance action to the tcp-request directive to handle the client assignment during a new
client transaction along with a conditional backend server assignment based on if the txn.lb.server variable
was set.
Note: this approach allows HAProxy to gracefully fail to an alternative backend server if the script has undefined behavior

Finally, I updated the backend section of my configuration file to include the update_last_seen action to handle
client packet transactions which should update the client-last seen time (again limitations apply here).
backend server_backend
   mode tcp
   option tcp-check
   tcp-response content lua.update_last_seen
   tcp-check connect port 5001
   server s1 server1 check inter 2s fall 1 rise 100
   server s2 server2 check inter 2s fall 1 rise 100
   server s3 server3 check inter 2s fall 1 rise 100
   use-server s1 if { var(txn.mapped_server) -m str s1 }
   use-server s2 if { var(txn.mapped_server) -m str s2 }
   use-server s3 if { var(txn.mapped_server) -m str s3 }
Note: I removed the balance leastconn directive along with the stick-table type ip and stick on src options here
since we don’t want the LUA script to be fighting with the default load balancing configuration
Note: Health checks were kept in place here, but is worth noting that they can interfere with the
tcp-response content directive depending on what your backend LUA code is doing.
I also added a number of use-server directives to assign the client to a given server based
on the txn.mapped_server variable set within the LUA script.
Note: there is no great dynamic way to assign a client to a server in HAProxy without
chain of use-server events given the limitations of the HAProxy and the use-server command
Testing our LUA Load Management Solution

At this point we should now have everything we need to test our custom load management solution!
After restarting the docker-compose stack and following the same test procedure as before.
If we open the homepage (via http://127.0.0.1:5001/) we see that we are once again
assigned to Backend Server 1.
Next, if we open up some additional browser tabs and two web stream instances (via http://127.0.0.1:5001/stream)
we can see the status page (via http://127.0.0.1:6801) reports two live connections and one
past connection on Backend Server 1.

If we then run the curl command on our client containers, we see that client 1 is assigned to Backend Server 2
while client 2 is assigned to Backend Server 3.
so far so good…

At this point, running the curl command on our third client container results in Backend Server 1 being assigned
(which is what we wanted), while client 4 is assigned to Backend Server 2, and client 5 is assigned to Backend Server 3.
At this point we can see that the load management solution is working as expected but, for the Coup de grâce, if we
invoke the curl command on our sixth client container we see that HAProxy now disconnects the client.
This result is expected since the sixth client would exceed the maximum number of users per server (given that three servers times two users per server is six users per our current setup).
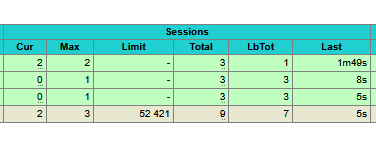
A review of the status page shows that Backend Server 1 has two live connections and two past connections, Backend Server 2 has two past connections, and Backend Server 3 has two past connections.

and this is the result we were expecting given the LUA script created.

Final Thoughts

Overall, during the process of creating this custom load management solution, I ended up learning quite a bit about HAProxy and its LUA scripting capabilities.
While I won’t profess to be an expert in either LUA or HAProxy, so I won’t make any bold assertations concerning the performance or validity of this approach…
I will say the possibilities associated with using LUA scripting with HAProxy do peak my interest, as I easily visualize a multitude of potential applications where this approach could be used.
For example, if we wanted to query a domain controller and grant application access to a user based on their group membership (likely via b2b or b2c authentication), we could likely make that happen.
Yet there are some oddly unique limits that the HAProxy LUA scripting environment does impose, like the inability to query the client IP address directly from the LUA script…
But we can also overcome these limitations by using external tools like netstat to collect this information if we were
so inclined, which makes it an even wash in the end.
So in the end, I would say that the HAProxy LUA scripting environment is a rather powerful tool and with great power comes great responsibility…
Hopefully, this blog post has been helpful to you, and I wish you the best of luck on your own proxy endeavors.